
Retrieving results
Retrieving Results is part of a free web series, ChemPlugin Modeling with Python, by Aqueous Solutions LLC.
What you need:
- ChemPlugin SDK 2025 recommended
-
Input files:
 Titration2_skel.py, Titration5_skel.py
Download this unit to use in your courses:
- Lesson Plan (.pdf)
- PowerPoint slides (.pptx)
Click on a file to open, or right-click and select “Save link as…” to download.
Introduction
Once you've triggered a ChemPlugin instance to calculate results for you, there are three strategies to retrieve the results:
- Use “Report1()” or “Report()” member functions to return a value or list of values to the client program
- On-demand output: have the client program trigger the instance to write a block of print-format or plot data to a file
- Self-scheduled output: instance writes results at intervals as it time marches
The first strategy is the subject of this lesson. The last two are described in detail in the next lesson.
To report a single value, use the “Report1()” member function
myValue = cp.Report1(target, ± unit)
and for a list of values, use the “Report()” member function
myValue = cp.Report(target, ± unit)
Targets are listed in the “Report Function” appendix to the ChemPlugin User's Guide and units are listed in the “Units Recognized” appendix.
As an example, you can retrieve the pH of an instance or its electrical charge imbalance using the “Report1()” member function, as below.
    pH = cp.Report1("pH")
    chg_imbal = cp.Report1("imbalance", "meq/kg")

    names = cp.Report("aqueous")
    conc = cp.Report("concentration aqueous", "mmol/kg")
The “Report()” function, similarly, can retrieve a list of items, such as species names or the concentration of those species using the “aqueous” and “concentration aqueous” targets, respectively.
As another example, you might wish to print the names and concentration of any species present above a certain concentration:
    names = cp.Report("aqueous")
    conc = cp.Report("concentration aqueous", "mmol/kg")
    nsp = len(names)

    for i in range(nsp):
        if (conc[i] > 10.0):
            print(" %-12s = %8.3f" % (names[i], conc[i]))
    print ("")
You first retrieve the name and concentration of all species, then write a loop to print those exceeding your threshold.
Task 1: Print species concentrations
After triggering an instance to calculate results for you, how do you retrieve the results from the instance? In this exercise, we'll replace a few commented lines in an almost-complete client to print the concentration of species at 10 μmol kg−1 or higher.
To get started, right-click on Titration2_skel.py and open it in Notepad++.
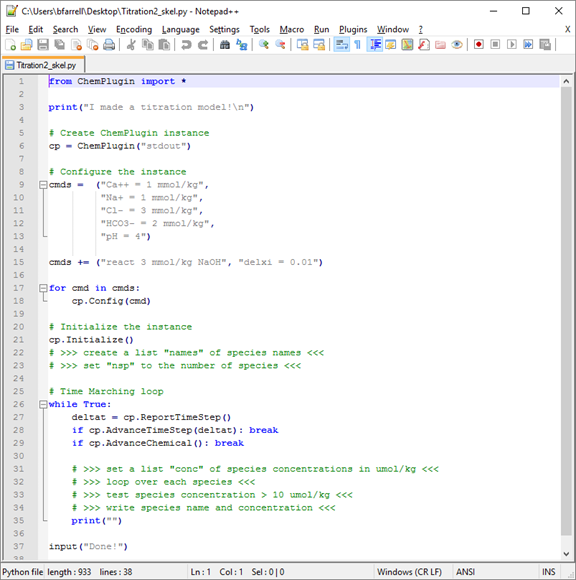
The client program is a simple titration model, much like that we looked at in the Time Marching Loops lesson. Rather than report the pH as NaOH is added, however, we want the client to report the concentration of species present above 10 μmol kg−1.
The strategy is to gather the species' names and store them in a vector, and to write the species' concentrations to a second vector. Note the species' names are available only after “Initialize()” has been called.
First, replace the “# >>>” lines where the instance is initialized
    # Initialize the instance
    cp.Initialize()
    # >>> create a list "names" of species names <<<
    # >>> set "nsp" to the number of species <<<
Next, replace the “# >>>” lines within the time marching loop
    # Time Marching loop
    while True:
        deltat = cp.ReportTimeStep()
        if cp.AdvanceTimeStep(deltat): break
        if cp.AdvanceChemical(): break

        # >>> set a list "conc" of species concentrations in umol/kg <<<
        # >>> loop over each species <<<
        # >>> test species concentrations > 10 umol/kg <<<
        # >>> write species name and concentration <<<
        print("")
They should look like:
        conc = cp.Report("concentration aqueous", "umol/kg")
        for i in range(nsp):
            if conc[i] >= 10.0:
                print("%-10s = %12.2f umol/kg" % (names[i], conc[i]))
The working code as a whole should look something like this:
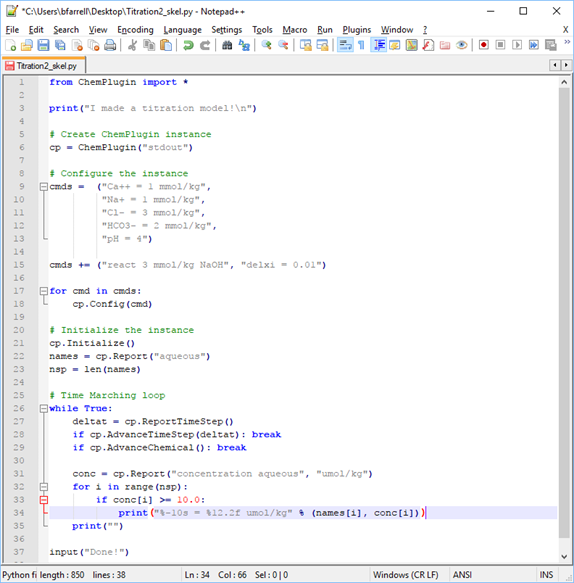
Save the file.
To see how it works, double-click the modified Python script. The Command Prompt will launch:
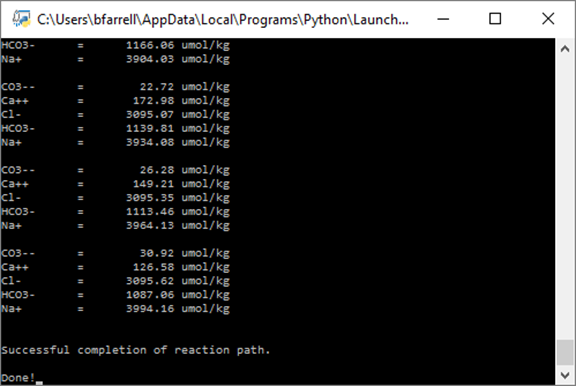
Remember from the previous exercise that pH increases from an initial value of 4 to an endpoint pH of 8.72. As the titration progresses, the concentration of CO2(aq) decreases as it reacts with the added protons to form HCO3-. Eventually the concentration of CO2(aq) falls below the threshold of 10 μmol kg−1. At the end of the simulation, HCO3- is the predominant form of dissolved carbon, with a subordinate amount of CO3-- ion.
Authors
Craig M. Bethke and Brian Farrell. © Copyright 2016–2026 Aqueous Solutions LLC. This lesson may be reproduced and modified freely to support any licensed use of The Geochemist's Workbench® software, provided that any derived materials acknowledge original authorship.
References
Bethke, C.M., 2022, Geochemical and Biogeochemical Reaction Modeling, 3rd ed. Cambridge University Press, New York, 520 pp.
Bethke, C.M., 2026, The Geochemist's Workbench®, Release 18: ChemPlugin™ User's Guide. Aqueous Solutions LLC, Champaign, IL, 303 pp.
Comfortable with Retrieving Results?
Move on to the next topic, Direct Output, or return to the ChemPlugin Modeling with Python home.