
Linking instances
Linking Instances is part of a free web series, ChemPlugin Modeling with Python, by Aqueous Solutions LLC.
What you need:
- ChemPlugin SDK 2025 recommended
-
Input files:
 Links1_skel.py, Links2.py, Links3.py
Download this unit to use in your courses:
- Lesson Plan (.pdf)
- PowerPoint slides (.pptx)
Click on a file to open, or right-click and select “Save link as…” to download.
Introduction
A link is a connection between two ChemPlugin instances, across which chemical mass and heat energy may pass.
- Use cp0.Link(cp1) to connect cp1 to cp0
- You can set any number of links between two instances
- A link is reciprocal: if you link cp1 to cp0, do not link cp0 to cp1, unless you want to create a second connection
A client program connects two instances with member function “Link()”, which returns a reference to the resulting link. For example, the code
    cp0, cp1 = ChemPlugin(), ChemPlugin()
    myLink = cp0.Link(cp1)
connects “cp0” and “cp1”, storing a reference to the link in variable “link0”.
Flow is by convention positive when it moves toward the instance that created the link, and negative in the opposite direction. In the above code, flow from “cp1” toward “cp0” is positive in sign, whereas flow away from “cp0” is negative.
Once two ChemPlugin instances are linked, a client might wish to hold onto the link's reference. For example, the code
myLink.FlowRate(0.02, "m3/s")
sets flow across “link”, as discussed later on. References to links, nonetheless, can be recovered easily. If two links to “cp0” have been set, for example, references to the links are returned
    myLink0 = cp0.Link(0)     # first link
    myLink1 = cp0.Link(1)     # second link
by calling the “Link()” member function with an integer argument.
It is also easy to determine the number of links to an instance, by using member function “nLinks()”. The code
    nLinks = cp0.nLinks()     # no. of links
    nLinks1 = cp0.nLinks(cp1) # links to cp1
stores the total number of links to “cp0” in variable “nlinks”, and the number of links between “cp0” and “cp1” in “nlink1”.
Free outlets are open links to a ChemPlugin instance. Fluid may flow across a free outlet away from the instance, but not toward it. There is no diffusion, dispersion, or heat conduction across a free outlet.
A client can set a free outlet with the “Outlet()” member function, or by calling “Link()” without an argument:
    myOutlet = cp0.Outlet()
        or
    myOutlet = cp0.Link()
Member function “nOutlets()” reports the number of free outlets connected to an instance.
noutlets = cp0.nOutlets()
A client program is free at any time to reconfigure the arrangement of ChemPlugin instances by removing and creating links. Member function “Unlink()” deletes a single link
    myLink.Unlink() # by link reference
        or
    cpo.Unlink(cp1) # by ref to instance
        or
    cp0.Unlink(0)   # by index
and member function “ClearLinks()”
cp0.ClearLinks()
removes all of the links to an instance.
Task 1: Linear chain
As an example, we consider a client program that arranges eight ChemPlugin instances in a linear chain. The chain is connected to an inlet boundary on the left side, and a free boundary on the right
The instances are referenced left-to-right as “cp[0]” through “cp[7]”, a boundary instance “cp_inlet” represents the inlet condition, and the free outlet is an open link:

To get started, right-click on Links1_skel.py and open it in Notepad++.
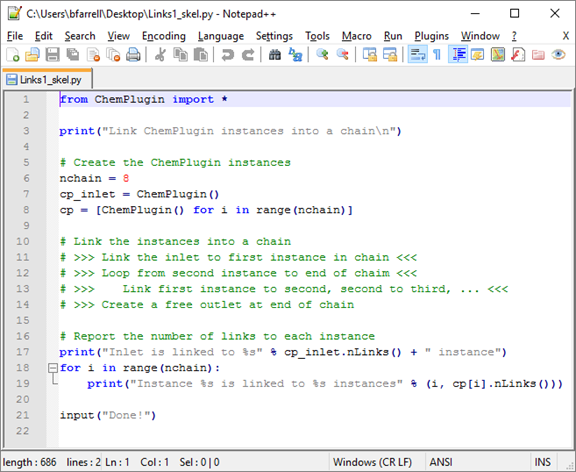
The first step is to create an instance representing the inlet, as well as each part of the chain:
    # Create the ChemPlugin instances
    nchain = 8
    cp_inlet = ChemPlugin()
    cp = [ChemPlugin() for i in range(nchain)]
Replace the “# >>>” lines with code to link the instances together. The inlet should be linked to the first interior instance, each interior instance to the one after it, and, finally, a free outlet created for the end of the chain:
    # Link the instances into a chain
    # >>> Link the inlet to first instance in chain <<<
    # >>> Loop from second instance to end of chain <<<
    # >>>     Link first instance to second, second to third, ... <<<
    # >>> Create a free outlet at end of chain <<<
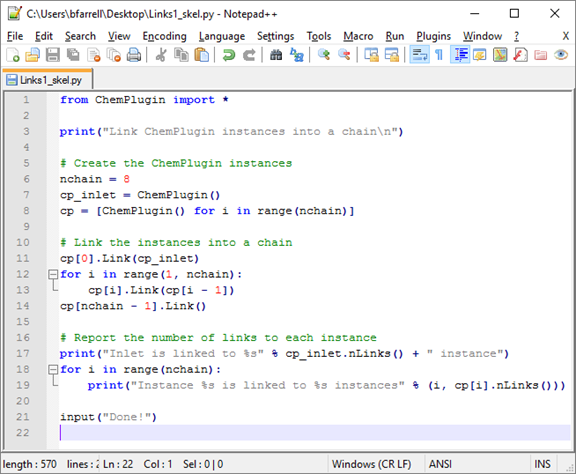
Your code should look something like this:
    cp[0].Link(cp_inlet)
    for i in range(1, nchain)
        cp[i].Link(cp[i - 1])
    cp[nchain - 1].Link()
The working code as a whole should look something like this:
Save the script.
To see how it works, double-click the modified Python script. The Command Prompt will launch:
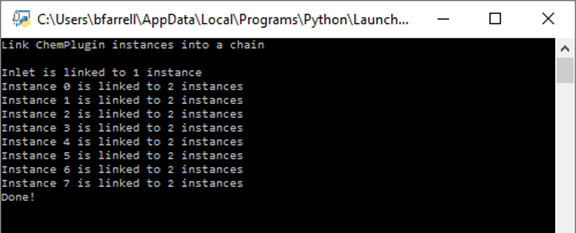
Comparing the output to our conceptual model
the results make sense. The Inlet is connected to a single instance, and each numbered instance in the chain is connected to two, with one on either side.
How could we verify the presence of the free outlet?
We could use the “nOutlets()” member function. Try inserting the block of code below:
    # Report the number of free outlets linked to each instance
    print("Inlet is linked to %s" % cp_inlet.nOutlets() + " free outlet")
    for i in range(nchain):
        print("Instance %s is linked to %s free outlets" % (i, cp[i].nOutlets()))
After saving and rerunning, the Command Prompt will show
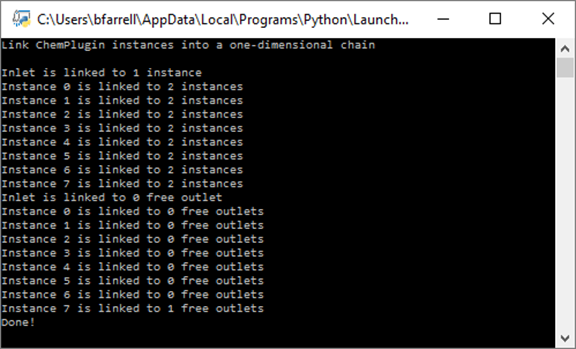
A single free outlet is linked to Instance 7. Fluid may flow to the free outlet, but not away from it.
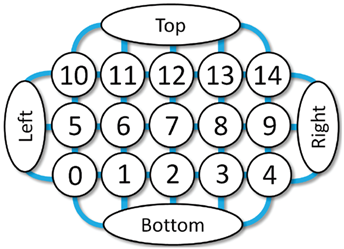
Grid
As a second example, we consider a 5x3 grid of instances, with the left, right, bottom, and top of the grid linked to boundary instances.
Right-click on Links2.py and open it in Notepad++.
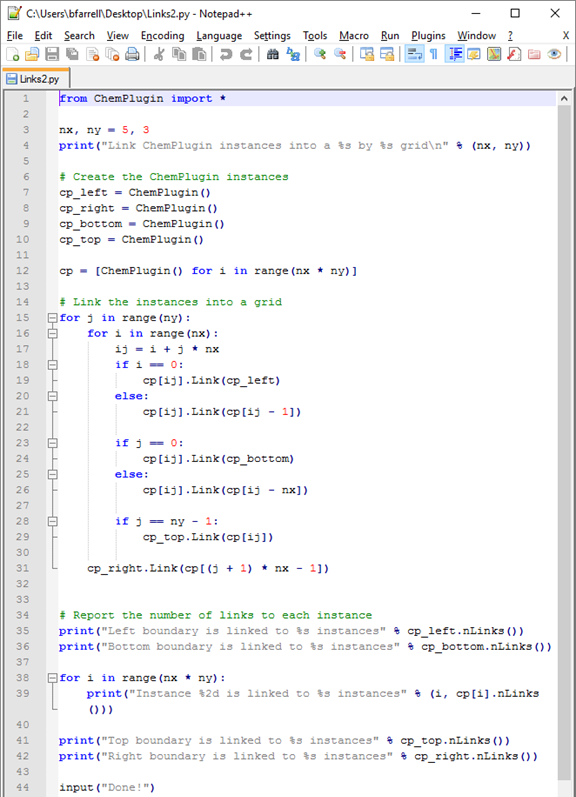
The first step is to declare the variables “nx” and “ny” representing the number of nodes along the x and y directions, respectively:
    from ChemPlugin import *

    nx, ny = 5, 3
    print ("Link ChemPlugin instances into a %s by %s grid\n" % (nx, ny))
Next, we create instances representing the left, right, bottom, and top boundaries, as well as the interior instances.
    # Create the ChemPlugin instances
    cp_left = ChemPlugin()
    cp_right = ChemPlugin()
    cp_bottom = ChemPlugin()
    cp_top = ChemPlugin()
    cp = [ChemPlugin() for i in range(nx * ny)]
Since we're making a 5x3 grid, there will be 15 interior instances.
Next, we set up two loops, an outer and inner loop, to scan over each instance and assign links to its neighbors.
    # Link the instances into a grid
    for j in range(ny):
        for i in range(nx):
            ij = i + j * nx
            if i == 0:
                cp[ij].Link(cp_left)
            else:
                cp[ij].Link(cp[ij - 1])

            if j == 0:
                cp[ij].Link(cp_bottom)
            else:
                cp[ij].Link(cp[ij - nx])

            if j == ny - 1:
                cp_top.Link(cp[ij])

    cp_right.Link(cp[(j + 1) * nx - 1])
Finally, we use the “nLinks()” member function to report the number of links to each instance
    # Report the number of links to each instance
    print("Left boundary is linked to %s instances" % cp_left.nLinks())
    print("Bottom boundary is linked to %s instances" % cp_bottom.nLinks())

    for i in range(nx * ny):
        print("Instance %2d is linked to %s instances" % (i, cp[i].nLinks()))

    print("Top boundary is linked to %s instances" % cp_top.nLinks())
    print("Right boundary is linked to %s instances" % cp_right.nLinks())

    print("Done!")
Running the script produces the following console output:
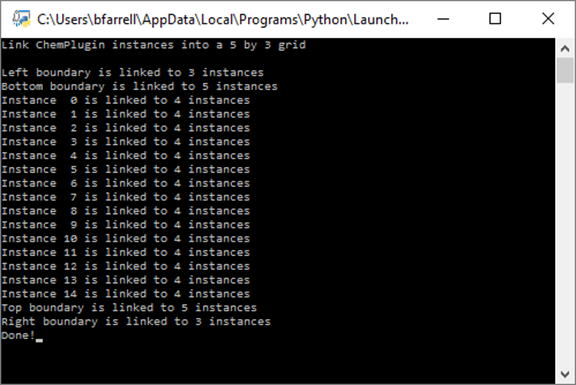
Each interior instance is linked to 4 other instances, the left and right boundaries to “ny” instances, and the top and bottom boundaries to “nx” instances.
Bifurcating tree
Finally, we look at a client program that builds a bifurcating tree of 4 levels.
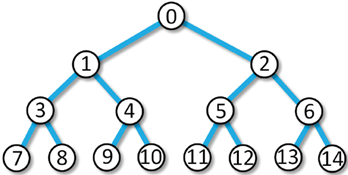
Since there are 2N − 1 nodes in a bifurcating tree of N levels, there will be 15 ChemPlugin instances in our linked domain.
Right-click on Links3.py and open it in Notepad++.
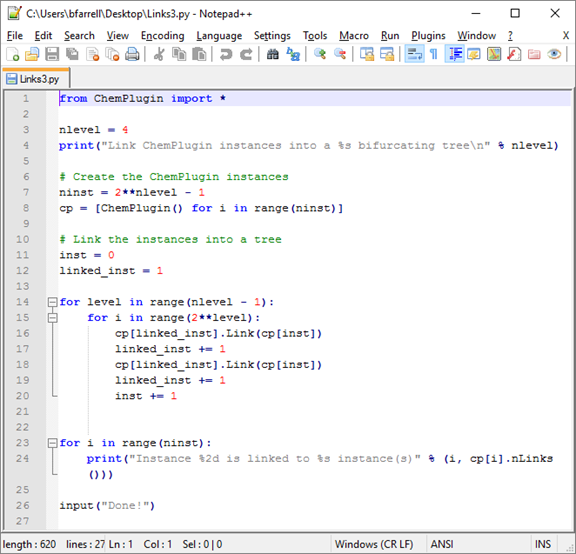
The first step is to set the number of N levels and create the appropriate number of ChemPlugin instances, each of which will represent a node in the bifurcating tree:
    nlevel = 4
    print ("Link ChemPlugin instances into a %s bifurcating tree\n" % nlevel)

    # Create the ChemPlugin instances
    ninst = 2**nlevel - 1
    cp = [ChemPlugin() for i in range(ninst)]
We set up two loops to link the instances into a tree
    # Link the instances into a tree
    inst = 0
    linked_inst = 1
    for level in range(nlevel - 1):
        for i in range(2**level):
            cp[linked_inst].Link(cp[inst])
            linked_inst += 1
            cp[linked_inst].Link(cp[inst])
            linked_inst += 1
            inst += 1
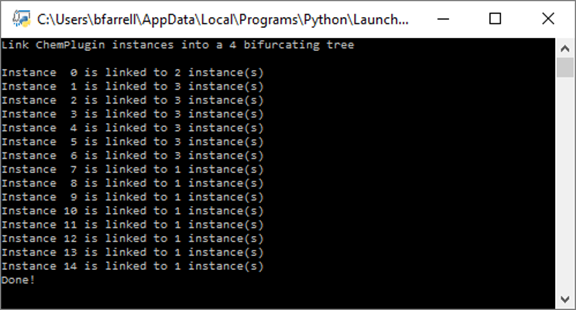
Finally, we use the “nLinks()” member function to report the number of links to each instance
    for i in range(ninst):
        print("Instance %2d is linked to %s instance(s) % (i, cp[i].nLinks()))

    input("Done!")
Running the script produces the following console output:
Authors
Craig M. Bethke and Brian Farrell. © Copyright 2016–2026 Aqueous Solutions LLC. This lesson may be reproduced and modified freely to support any licensed use of The Geochemist's Workbench® software, provided that any derived materials acknowledge original authorship.
References
Bethke, C.M., 2022, Geochemical and Biogeochemical Reaction Modeling, 3rd ed. Cambridge University Press, New York, 520 pp.
Bethke, C.M., 2026, The Geochemist's Workbench®, Release 18: ChemPlugin™ User's Guide. Aqueous Solutions LLC, Champaign, IL, 303 pp.
Comfortable with Linking Instances?
Move on to the next topic, Flow and Transport, or return to the ChemPlugin Modeling with Python home.